
There's a question that I get asked a lot when I'm at the river fishing. I'd be fishing in some stream or pool when another fly angler appears on the bank. "Any good?", is usually the first question. My answer to that really depends on the mood I'm in on the day. "Nah!", would be my normal response, even if I've hooked fish some days. Sometimes though, I will say that I'd hooked one, or got one, or touched a couple. You can forecast the next question you'll be asked. "What size are you fishing?".
My response to this is to just say the size of the hook I'm using. This seems to finish the conversation too so the person asking the question must be satisfied with the answer. Does this answer the question though?
For a start, there is no standard for hook sizes. A size 8 in one brand can be a very different size and shape to a size 8 in another brand. There are low water hooks, heavy hooks, short shanked, long shanked, etc. It will say size 8 on the packet but all of these hooks will be very different in overall size.
Then there are the different styles of fly. A hairwing fly like a Stoat's Tail or Editor will be very different in overall size in the water to a long tailed fly like a Cascade or even an Irish Shrimp fly. These latter flies will be almost twice the length of the Editor for example.
Everyone has their own preferences and opinions when it comes to tying their own flies. As for flies for actually fishing with, there really is no wrong way to tie a fly. If there's a hook in the water with some sort of materials on it, it runs as much chance of hooking a salmon than a masterpiece tied by some celebrity fly tier on the internet. From a fly tying viewpoint though, there are some simple steps you can take to improve the overall look of your flies.
There has been a great increase in the number of long tailed salmon flies being used in recent years. This is to be expected with the success of the long tailed shrimp flies of Ally Gowans, with his Ally's and Cascade shrimps. The success of those two flies alone have seen so many variants of those patterns and other patterns which have become successful since.
The Cascade is arguably the most used, so therefore most successful pattern, used today. It is one of the most attempted patterns by fly tiers too. Looking at so many attempts over the years, it would seem that the tail of these long tailed flies is almost overlooked. In my own mind and general overthinking, the tail of these flies is vitally important.
In
my head, when I picture a fly swinging round in the current, reacting
to the different pressures of the water currents, the tail plays a big
part in what attracts a salmon to your fly. You can try this yourself
by holding a fly in the water and moving it from left to right. Does the
tail have nice 'wavey' action? Does it move gently in the currents?
If not, why not?
Is the tail too short? Too heavily dressed? It might have movement but maybe it's too long?
Too
long of a tail can have another issue too. A few years ago, I went
through a spell of getting really aggressive takes when fishing. I
would be out fishing, the fly swinging round in the current, I'd get a
take that "...nearly took the rod out of my hand...", I'd lift into the
take and there would be nothing there. I suspected that the fish had
taken the tail of the fly, which was too far away from the hooks, and
never came close to being hooked. So, how could I tie a tail that was
long enough to have movement but not too long that the ends were too far
away from the hooks? It may not have anything to do with the tails mind you. The season just passed, I don't believe I've ever 'touched' as many fish without hooking them. That is part of fishing but by tying a more uniform tail, perhaps we can make these instances fewer and farther between.
I
started looking at longtail flies online and reading different bits and
pieces. I just can't remember where I read it, it may have been on the
Salmon Fishing Forum online, but someone had posted a step by step in
pictures of tying a fly and one wee detail stood out. To most people,
they wouldn't have taken a second look at one wee line of text in a very
picture oriented thread. "Make the tail twice the length of the hook
shank". It was a real lightbulb moment for me. Of course, hooks are all
different lengths, even within stated sizes in different brands. Use
the hook to gauge the length of the tail. So, so simple. Why hadn't I
thought of that?
I
started doing that and have stuck with it ever since. It just makes
things so much easier when it comes to tying different sizes of the same
fly. No longer do I have a size 12 Cascade with a size 6 tail.
I first tied this longtail fly a couple of years ago. It was for a Tie of the Month Competition on the Salmon Fishing Forum. It was a longtail fly tied using the colours of the famous Scottish hairwing pattern, the Willy Gunn.
This is in no way an "I'm right and you're wrong" blog post. If anyone wants to take onboard what I say then great. If people want to stick to their own preferences, that is what fly tying is about. If it helps a beginner then I'll be over the moon!
So, put a hook in the vice. This is a Partridge Nordic Down Eye Double in size 6. Easier to photograph rather using a smaller hook.

Start winding on your tying thread, a few millimeters down the shank from the eye of the hook. This clear section of hook will allow me to form a neater head.

I'll tie in my tag material at this point

Now wind the thread back towards the bends on the hook

Now wind on three turns of the tinsel in forward, touching turns and secure with three turns of thread. Cut the tinsel roughly the same length as the area of the hook covered in thread. Leaving the ends of the tag tinsel in this way helps to form a nicer, level, body when it comes to adding a tinsel or floss body.

We are now ready to add the tail. I had thought about just tying in a bunch of bucktail here and carrying on with the step by step. I then thought it might be useful to some to show how I make my tails. So here goes. Feel free to jump on down the page for the continuation of the step by step.
This pattern uses bucktail. Just like the Cascade and Ally's Shrimp flies mentioned previously. Bucktail is a relatively cheap material but you can pay higher prices for 'premium' bucktail. There is nothing fancy here. Two veniards bucktails, yellow and orange, bought in local tackle shops in the past and a black one from Bann Valley. They were all roughly the same price.

Now cut out a bunch of bucktail from each one.

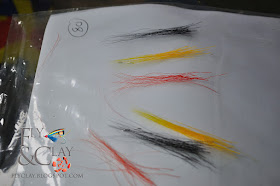
This is where I get more than a bit pedantic. The whole lot could be mixed together here but I go a wee bit over the top. One thing that I don't like about many longtail flies I see in various places is the different lengths of the tips of the fibres. I personally like to see as close to nicely lined up tips as possible.
The three different bucktails above have very different fibres so I'll line up the tips of each bunch individually. To do this, I use small pots. You can buy purpose made hair stackers for this job but any pot or tub will do the same job. I've even used empty shotgun cartridges in the past.

Work the materials into the tub by gently pushing them in with the palm of your hand. Tap the tup on the desk. Shake the tub from side to side. Keep doing these things until you feel the tips are as lined up as possible with the bottom of the tub.
Remove each coloured bucktail from the tubs.
So, now you should have three sets of bucktail fibres all roughly the same length

These are three quite large bunches. Half of this material would do. I will now separate them out in smaller bunches.
Bunch one of these sets together. You can bunch the other set together too if you wish or keep the colours separated to one side.

Back into the mixing pot with this bunch. The smaller bunches are easier to mix than one large bunch.

After some more shaking and tapping, you should have a nicely mixed and lined up set of bucktail fibres. By keeping the bunches separate in the previous step, you can add more of each colour to the mix if you wish. More yellow for spring, more orange for coloured water or more black to tone the whole thing down. I've actually added more black above.

Not too bad for length overall. I'll now pull the shorter fibres up by hand to make them roughly the same length as the rest or sometimes pull them out of the bunch altogether if they are misshapen. We are now ready to tie the material onto the hook. Or are we?

There still seems to be a lot of material here. Tying in a bunch of bucktail that is too heavy just completely kills the movement of these types of fly. I think I can half this bunch again. Less is more on these flies in my opinion. If you want a heavier dressed fly, go ahead and tie in the bunch at this point.

Two nice sized bunches from the one big bunch above.

I'll use this one for my tail.
This is now probably the most important part of a longtail fly for me. Getting a decent length tail but not having it too long or too short. As I said earlier, hooks are all different shapes and sizes so use the hook to gauge the materials to be used. Keep the materials in proportion to the hook. Here is how I do this.

Line up the materials along the shank of the hook. Holding the materials just behind the eye, or even to the front of the eye if you want a tail slightly longer, line the tips of fibres roughly with the bends of the hook. That is 'once' the length of the hook.

Now hold the fibres at the point where they are being held in the previous picture and bring this point to somewhere between the points the hook and the bends on the hook.

You now have a tail that is roughly twice the length of the hook shank. I will tie my tail in at the point I'm holding the materials at above

You can now cut off the waste material. I'll cut these at roughly the same length of the hook shank that is covered with thread. This will help to keep the body flat.

A couple of strands of Krystal Flash

And then my ribbing material

Wind the thread forward now in touching turns

You should now have a nice flat base to put the body material on. You can add a tinsel or floss body here. I'll use flat gold.

This is the tinsel which is silver on one side and gold on the other. Tie it in with the siver side facing you. It turns over onto the gold side much easier I find.

Wind the tinsel right down to the tail

And then wind it forward again. This helps to cover any bits missed on the first pass and also helps to even out the tinsel if the thread isn't completely flat.
Now wind on your rib and you are ready to add the wing.

This is the same black bucktail that I cut the material from for the tail. I has already been in the stacking pot before this picture was taken. Again, nice level tips. I don't really want my wing coming any further than the bends of the hook. Line them up and tie them in.

A couple of strands of Krystal Flash and trim off all the waste material.

We are now ready to add our hackles. There are three on this pattern which are tied in as one.

Hackles are another area that should be proportioned to the hook. Line up your hackle with the hook. If the tips of the hackles will be past the bend of the hook then they are too long. If they are shorter the points of the hooks they are probably too short and won't have much movement in the water. Ideally, the hackle should be between 1mm in front of the hook points to the barbs of the hooks.

The three hackles that will form this fly. It is vitally important that you double the hackles here. It leaves things so much easier.
I'll take another step away from the Step By Step here to give some idea of how I double my hackles. I've used the same yellow hen hackles as used in this step by step. If you are going to tey this method, try it first with a larger hackle. You may find it easier to hold and the longer fibres may fold easier for you. With a bit of practice, you will be able to double any type of hackle. It is fiddly to begin with but is well worth it if you persevere.
Start by pulling the hackle fibres downwards.

Now place hold the stalk of the hackle with the last three fingers of your left hand, leaving the thumb and forefinger free

Now turn your hand down so that you can hold the tip of the feather with the forefinger and thumb of the right hand

You can now use the thumb and forefinger of the left hand to stroke the fibers back onto each other. Pulling the fibres back towards your left hand as you do so.

Keep going as far down the feather as you can

This will give a good basis for a folded hackle.

When you tie the hackle onto the hook by the tip of the feather. Give the fibres a stroke backwards before each wind of the hackle. It will make such a difference to your tying.
So, First double the yellow hackle. Then the orange. Put the yellow hackle inside the 'V' of the orange hackle.

Now put these two inside the black hackle and tie them onto the hook as one hackle.

After stroking the hackle fibres back, give one turn of the three hackles and secure with three turns of thread.

Now separate out the hackles again.

I want to darken this fly so I'll give another turn of black on its own. Secure in and cut off the rest of the hackles

A couple of Jungle Cock eyes

And a drop of varnish to secure.

And there you have the Willy Gunn Longtail.
These proportions are transferable to other patterns of flies. Keep the hackles of all flies just in front of the hook points but never longer than the barbs. I also keep the wings of my Flamethrowers twice the length of the hook. The tails of Irish Shrimps I don't like to be any longer than one and a half times the length of the hook shank. By following these proportions, you run a better chance of keeping your flies to the stated size. i.e. A size 12 cascade will be a lot smaller and shorter overall than a size 8 or 6.
As I've said previously, these are the proportions that I tie too and everyone will have their own preferences. No one is right or wrong. Just enjoy your tying. That us what it is all about for me.
This pattern uses bucktail. Just like the Cascade and Ally's Shrimp flies mentioned previously. Bucktail is a relatively cheap material but you can pay higher prices for 'premium' bucktail. There is nothing fancy here. Two veniards bucktails, yellow and orange, bought in local tackle shops in the past and a black one from Bann Valley. They were all roughly the same price.

Now cut out a bunch of bucktail from each one.

This is where I get more than a bit pedantic. The whole lot could be mixed together here but I go a wee bit over the top. One thing that I don't like about many longtail flies I see in various places is the different lengths of the tips of the fibres. I personally like to see as close to nicely lined up tips as possible.
The three different bucktails above have very different fibres so I'll line up the tips of each bunch individually. To do this, I use small pots. You can buy purpose made hair stackers for this job but any pot or tub will do the same job. I've even used empty shotgun cartridges in the past.

Work the materials into the tub by gently pushing them in with the palm of your hand. Tap the tup on the desk. Shake the tub from side to side. Keep doing these things until you feel the tips are as lined up as possible with the bottom of the tub.
 |
| Ends at different heights should mean tip lined up at the bottom of the tub |
 |
| A few longer fibres but these can be removed by hand |

These are three quite large bunches. Half of this material would do. I will now separate them out in smaller bunches.

Bunch one of these sets together. You can bunch the other set together too if you wish or keep the colours separated to one side.

Back into the mixing pot with this bunch. The smaller bunches are easier to mix than one large bunch.

After some more shaking and tapping, you should have a nicely mixed and lined up set of bucktail fibres. By keeping the bunches separate in the previous step, you can add more of each colour to the mix if you wish. More yellow for spring, more orange for coloured water or more black to tone the whole thing down. I've actually added more black above.

Not too bad for length overall. I'll now pull the shorter fibres up by hand to make them roughly the same length as the rest or sometimes pull them out of the bunch altogether if they are misshapen. We are now ready to tie the material onto the hook. Or are we?

There still seems to be a lot of material here. Tying in a bunch of bucktail that is too heavy just completely kills the movement of these types of fly. I think I can half this bunch again. Less is more on these flies in my opinion. If you want a heavier dressed fly, go ahead and tie in the bunch at this point.

Two nice sized bunches from the one big bunch above.

I'll use this one for my tail.
This is now probably the most important part of a longtail fly for me. Getting a decent length tail but not having it too long or too short. As I said earlier, hooks are all different shapes and sizes so use the hook to gauge the materials to be used. Keep the materials in proportion to the hook. Here is how I do this.

Line up the materials along the shank of the hook. Holding the materials just behind the eye, or even to the front of the eye if you want a tail slightly longer, line the tips of fibres roughly with the bends of the hook. That is 'once' the length of the hook.

Now hold the fibres at the point where they are being held in the previous picture and bring this point to somewhere between the points the hook and the bends on the hook.

You now have a tail that is roughly twice the length of the hook shank. I will tie my tail in at the point I'm holding the materials at above

You can now cut off the waste material. I'll cut these at roughly the same length of the hook shank that is covered with thread. This will help to keep the body flat.

A couple of strands of Krystal Flash

And then my ribbing material

Wind the thread forward now in touching turns

You should now have a nice flat base to put the body material on. You can add a tinsel or floss body here. I'll use flat gold.

This is the tinsel which is silver on one side and gold on the other. Tie it in with the siver side facing you. It turns over onto the gold side much easier I find.

Wind the tinsel right down to the tail

And then wind it forward again. This helps to cover any bits missed on the first pass and also helps to even out the tinsel if the thread isn't completely flat.
Now wind on your rib and you are ready to add the wing.

This is the same black bucktail that I cut the material from for the tail. I has already been in the stacking pot before this picture was taken. Again, nice level tips. I don't really want my wing coming any further than the bends of the hook. Line them up and tie them in.

A couple of strands of Krystal Flash and trim off all the waste material.

We are now ready to add our hackles. There are three on this pattern which are tied in as one.

Hackles are another area that should be proportioned to the hook. Line up your hackle with the hook. If the tips of the hackles will be past the bend of the hook then they are too long. If they are shorter the points of the hooks they are probably too short and won't have much movement in the water. Ideally, the hackle should be between 1mm in front of the hook points to the barbs of the hooks.

The three hackles that will form this fly. It is vitally important that you double the hackles here. It leaves things so much easier.
I'll take another step away from the Step By Step here to give some idea of how I double my hackles. I've used the same yellow hen hackles as used in this step by step. If you are going to tey this method, try it first with a larger hackle. You may find it easier to hold and the longer fibres may fold easier for you. With a bit of practice, you will be able to double any type of hackle. It is fiddly to begin with but is well worth it if you persevere.
Start by pulling the hackle fibres downwards.

Now place hold the stalk of the hackle with the last three fingers of your left hand, leaving the thumb and forefinger free

Now turn your hand down so that you can hold the tip of the feather with the forefinger and thumb of the right hand

You can now use the thumb and forefinger of the left hand to stroke the fibers back onto each other. Pulling the fibres back towards your left hand as you do so.

Keep going as far down the feather as you can

This will give a good basis for a folded hackle.

When you tie the hackle onto the hook by the tip of the feather. Give the fibres a stroke backwards before each wind of the hackle. It will make such a difference to your tying.
So, First double the yellow hackle. Then the orange. Put the yellow hackle inside the 'V' of the orange hackle.

Now put these two inside the black hackle and tie them onto the hook as one hackle.

After stroking the hackle fibres back, give one turn of the three hackles and secure with three turns of thread.

Now separate out the hackles again.

I want to darken this fly so I'll give another turn of black on its own. Secure in and cut off the rest of the hackles

A couple of Jungle Cock eyes

And a drop of varnish to secure.

And there you have the Willy Gunn Longtail.
These proportions are transferable to other patterns of flies. Keep the hackles of all flies just in front of the hook points but never longer than the barbs. I also keep the wings of my Flamethrowers twice the length of the hook. The tails of Irish Shrimps I don't like to be any longer than one and a half times the length of the hook shank. By following these proportions, you run a better chance of keeping your flies to the stated size. i.e. A size 12 cascade will be a lot smaller and shorter overall than a size 8 or 6.
As I've said previously, these are the proportions that I tie too and everyone will have their own preferences. No one is right or wrong. Just enjoy your tying. That us what it is all about for me.
No comments:
Post a Comment